Yesterday we moved the new kids out from the kidding stalls into their new stall with combined quarters. We installed our warming hut and the kids are enjoying it's warmth.
Hut How to:
We took a 55 gallon used juice drum and cut a door opening for the kids. We then cut a 2" hole in the top to mount our light fixture to.

You will need a junction box, our hut is inside the barn so we didn't need a weatherproof box.

You will need a light fixture like this one

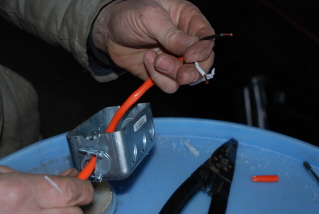
An extention cord long enough to reach where you plan to plug it in. Cut off the end as shown.

Run the cut off end through the junction box and use wire cutters to strip the wires as shown.
Run the cord down through your 2" hole on the top of the barrel to the kid door on the bottom. Attatch the wires to your light fixture. Then you'll need to crawl in the barrel to screw the light fixture from below to the junction box on the top of your barrel.

Here's our light installed. This one is just a 50 watt flood light. It's pretty cold out right now, 27°F during the day and cooler at night so I ended up switching it out to a 125 watt grow light and it's the perfect temp for them. There are two screw on caps to each side of the light that can be unscrewed for more airflow if the temperature is to high. This is what worked for us.You could also install a heat lamp as they indicated in the above file as well.

Here we screwed the barrel to the wall (on both walls) so that it can not be tipped over.


Kid tested and approved!

The six kids are two weeks old right now and fit comfortably. They will not need it much longer as it starts getting warmer outside.
No comments:
Post a Comment