Sunday, February 19, 2012

Kid Warming Hut

Inspired by the pdf of the warming barrel on this page http://www.vkvboers.com/index_page0007.htm , my husband built me a warming barrel back in December for our upcoming kids. He held off on installing the light until yesterday.

Yesterday we moved the new kids out from the kidding stalls into their new stall with combined quarters. We installed our warming hut and the kids are enjoying it's warmth.

Hut How to:

We took a 55 gallon used juice drum and cut a door opening for the kids.  We then cut a 2" hole in the top to mount our light fixture to.
You will need a junction box, our hut is inside the barn so we didn't need a weatherproof box.

You will need a light fixture like this one

An extention cord long enough to reach where you plan to plug it in. Cut off the end as shown.


Run the cut off end through the junction box and use wire cutters to strip the wires as shown.
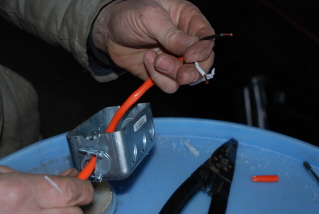
Run the cord down through your 2" hole on the top of the barrel to the kid door on the bottom.  Attatch the wires to your light fixture.  Then you'll need to crawl in the barrel to screw the light fixture from below to the junction box on the top of your barrel. 


Here's our light installed.  This one is just a 50 watt flood light.  It's pretty cold out right now, 27°F during the day and cooler at night so I ended up switching it out to a 125 watt grow light and it's the perfect temp for them.  There are two screw on caps to each side of the light that can be unscrewed for more airflow if the temperature is to high.  This is what worked for us.You could also install a heat lamp as they indicated in the above file as well. 


Here we screwed the barrel to the wall (on both walls) so that it can not be tipped over.


Kid tested and approved!


The six kids are two weeks old right now and fit comfortably.  They will not need it much longer as it starts getting warmer outside.

Monday, February 6, 2012

First Kids of 2012

Kids are here! Wandering Ivy CM Cindy Lou had 2 bucklings & 1 doe sired by NC PromisedLand Moon Mullican *S. She made me wait until day 150.  They were born @ 4:30 PM today.
First Buckling

Second Buckling


And lastly, the little Doeling

The first two presented with nose & front feet and the doeling came head first no legs.  Easy kidding and they were all up within minutes and nursing soon after the doeling was born. I was able to take a few pictures of the kidding process.


Here she is beginning to push.


Here you can see a foot and nose.


And here she has pushed him out and I put the camera down to clean off his nose.


And here she is cleaning him off.

Now if only Ginny would get on board and have her kids.  Today is day 149 for her.  We shall see soon.

Friday, February 3, 2012

Doe's Secret Code of Honor

My does are on day 146 (Ginny) & 147 (Cindy) of their pregnancies.  My records from last year indicate that Cindy Lou kidded on day 146 and Ginny kidded on day 148. As of today Ginny's ligs are still tight and no signs indicate she will have kids today.  Cindy's ligs are softening but still present.  Yesterday she spent the entire day blubbering and acting like a buck towards one of the Jr. does who apparently was in heat.  My kidding stalls are cleaned and everything is ready to go.  I have no errands to run and no place that I have to be for the next three days so come on girls, please don't adhere to the "Doe Code." 

Doe’s Secret Code of Honor

During this time of year when we start to think about the pitter patter of little hooves running around the house and the does soon to kid. I know some of us are already in kidding season and for the rest it is fast approaching. I am also reminded to take out my copy of the Does Secret Code. To those of you that have never herd the legend of the code. It is said to be older that domestic goats, written back when man first realized that goats could be tamed and tasted the sweet taste of fresh goats milk. It was then that the code was written. It has been passed from doe to doeling, hidden first under stones and in hollow trees. Then later as people begin to house goats in barns and stables it was hidden in the cracks in the walls and hollows under the mangers and hay racks. Even though no one truly knows who discovered “The Code” (I think they were scared to admit finding it for fear their does would revolt) It is rumored that it was first found on a small farm in the mountains of Switzerland early in the 19th century. That copy was carbon dated and it was found to be written in ancient goat language dating 437 B.C. It took scholars years to translate it, late in the 20th century around 1963 the translation finally completed it began to be passed from goat keeper to goat keeper. I was given a copy a couple of years ago by an old goat keeper who took me under his wings and here it is for those of you who are new to goats and haven’t seen it.

The doe’s secret code of honor is as old as goats themselves and is ultimately the species best kept secret. No doe shall ever kid before it’s time. (It’s time being determined by the following factors):

1- No kid shall be born until total chaos has been reached by all involved. Your owner’s house must be a wreck, their family hungry and desperate for clean clothes, and their social life nonexistent.

2- “Midwives” must reach the babbling fool status before you kid out. Bloodshot eyes, tangled hair and the inability to form a sentence mean the time is getting close.

3- For every bell, beeper, camera or whistle they attach to you, kidding must be delayed by at least one day for each item. If they use an audio monitor, one good yell per hour will keep things interesting.

4- If you hear the words, “She’s nowhere near ready. She’ll be fine while we’re away for the weekend,” Wait until they load the car, then begin pushing!

5- Owner stress must be at an all time high! If you are in the care of someone else, ten to fifteen phone calls a day is a sign you’re getting close.

6- When you hear the words “I can’t take it anymore!” wait at least three more days.

7 -You must keep this waiting game interesting. False alarms are mandatory! Little teasers such as looking at your stomach, pushing your food around in the bucket and then walking away from it, and nesting, are always good for a rise. Be creative and find new things to do to keep the adrenaline pumping in those who wait.

8- The honor of all goats is now in your hands. Use this time to avenge all of your barn mates. Think about your friend who had to wear that silly costume in front of those people. Hang onto that baby for another day. OH, they made him do tricks too! Three more days seems fair. Late feedings, the dreaded diet, bad haircuts, those awful wormings can also be avenged at this time.

9- If you have fulfilled all of the above and are still not sure when to have the kids, listen to the weather forecast on the radio that has been so generously provided by those who wait. Severe storm warning is what you’re waiting for. In the heart of the storm jump into action! The power could go out and you could have the last laugh. You have a good chance of those who wait missing the whole thing while searching for a flashlight that works!

10- Make the most of your interrupted nights. Beg for food each time someone comes into the barn to check you. Your barn mates will love you as the extra goodies fall their way too.

Remember, this code of honor was designed to remind man of how truly special goats are. Do your best to reward those who wait with a beautiful doeling to carry on the Doe Code of Honor for the next generation of those who wait!

From Tom Kuettner


Well, for now I am left to wait & watch the barn cam or "Goat TV" as my 2 legged kids & I refer to it. Sometime soon, my does WILL have kids :-) 

Friday, January 27, 2012

Preggy Goat Bellies

Less than a week before kidding season begins.  I have two does due within a day of each other.  Ginny is looking rather wide, guessing 3-4 kids are cramped in there.  She is making pregnant goat sounds and would rather lay down than do anything requiring energy, besides eating of course.

Cindy Lou's hormones are kicking in and she's acting very bucky towards a few young does that are inheat.  She's flapping her tongue and making bucky noises. Her kids have dropped noticably too. Also guessing between 3-4 kids in there.


I'm guessing between next Wed & Friday I'll have some little ones jumping around.

Wednesday, October 19, 2011

Apple Cider

We purchased a bin of Macoun apples from Windy Ridge Orchard last week to make cider.  Usually we go around and collect free apples from people that don't want them but this year we have been unbelievably busy and just didn't have time.  It was so much easier buying them and it really wasn't that expensive.
This bin was full when we started.  Wish I had thought to snap a picture. We start by washing each apple with the hose.  It was a cold job as the temperatures were only in the high 40's.

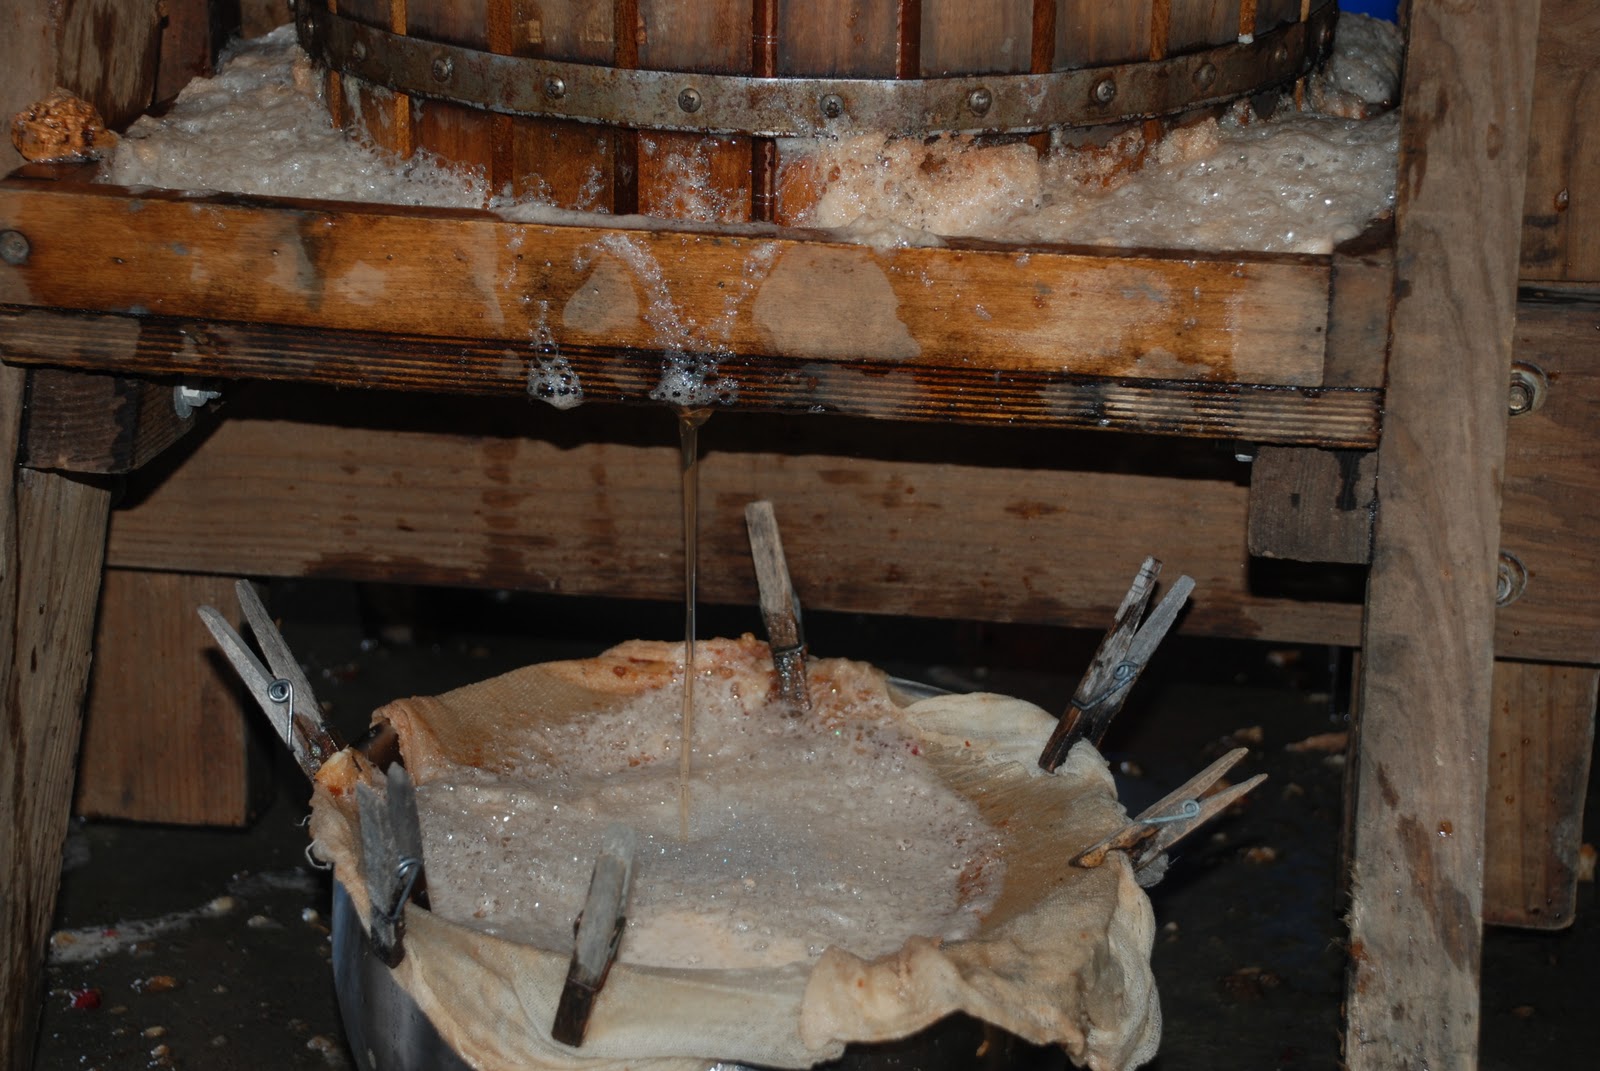
This is our press.  There is a hopper on the back side that you put the apples in and then you turn the handle, or in our case run the drill to turn the choppers that grind up the apples. The barrel is lined with a cloth full of tiny holes to keep the chunks in & let the juice flow. Once the barrel is full of chopped apples we turn the handle on top which compacts the apples and the juice flows out the bottom tray into our dish.  If you look closely you can see the juice draining into the bowl.  The bowl is lined with cheesecloth to filter out the small pieces of apples that may get through. 
These apples were juicy and one press was making almost 3 gallons of cider. We ended up making 30 gallons of cider.  We don't fill them all the way so that we can freeze them.

We feed the remaining ground apples to our goats and horses in moderation.  Any leftovers are spread on my garden for fertilizer.

We saved some apples for canning and apple pies, plus we need a couple bushels for the kids to press at our annual Halloween party.
 Now we can enjoy sweet, unpasteurized apple cider until next fall when we start all over again. Yum!

Wednesday, September 28, 2011

Turkey House

The turkeys are growing really fast.  I love my remodeled hoop house.  It is longer and lighter making it easier for me to move by myself.
I had originaly constructed the frame out of wooded 2 x 4's but it was really heavy.  My husband reconstructed it with a nice new aluminum frame.  This baby will last forever. I situate it so that the turkeys get the early morning sun and then the tarp gives them shade in the afternoon.

You can make one of these really easy.  This one is made from two combination cattle panels and one hog panel in the center. The panels are attatched to a frame and then covered with chicken wire to keep the youngsters in.  Any larger and it would take more than one person to move it. The above photo is when I first put all 15 turkeys in it in June.

This is the access door made from some scrap aluminum we had at the shop.  The hose goes to the automatic water which is a huge time and back saver.

I now have 5 adult turkeys in it.  I move it to new grass every couple of days.  No need for cleaning or shavings here.  The turkey like to eat the grass and bugs too. Usually I raise 50 meat birds in the spring using the hoop house and then transfer the turkeys to it after the chickens are processed.  This year I skipped the meat birds because my freezer is still full of them from last year.  

Monday, September 26, 2011

Morning Surprise

So this summer has been really busy and I haven't found time to blog.  This am I decided to make time. Here is a good one....This am I went to do chores.  I fed the bucks & the pony & the new goats.  Then I milked my two alpines and fed that pen. I went to feed the dry does their hay, went in the stall, opened up the hay bag to put the hay in , glanced to my right and saw a "goat" lying next to the creep feeder pen and thought "why aren't you bombarding me for the hay this am?" and THEN I looked closer and the "goat" was not a "goat"!   IT WAS A FREAKIN COYOTE!!!!!!!!  I was close enough to pat it! I dropped the hay and ran franticly screaming.  My husband had already left for work so I had to call my FIL and hystericly told him to come quick with his gun.  Then I went through the kids pen jumped the fence & locked him in the stall so he couldn't get away.  I looked over every does neck and hind end and not one of them has a bite mark on them.  So did one of my does beat the bejesus out of him?  Is that why he was cowering in there?  I don't know but I'm still pretty shook up!  Too bad I didn't take pictures but I was a little out of my mind! Anywho, my FIL came & shot him and disposed of him, bye bye coyote.....You messed with the wrong farmer chic!

Friday, June 24, 2011

Chevre

I made some chevre for one of my husband's customers. He mentioned to his customer that I happened to make goat cheese and his customer is having a big birthday bash this weekend so I gave him some to enjoy.  It is so simple to make and delicious too, not to mention it uses up at least a gallon of my abundant milk supply.

Chevre Recipe:
Warm 4-5 qts of milk to 80°F
add 1/8 tsp starter (I like Flora Danica) let sit for 2 minutes before stirring
put 3 drops liquid rennet in 1/3 cup cold water
add 2 tbsp of the diluted rennet mixture to milk


Let set for 12-18 hours until curd forms. 

                               
Scoop curds into a colander lined with cheesecloth.
Hang to drain overnight.

This is what it looks like when you remove from cheesecloth.  This is when you add some salt to taste and whatever seasonings you desire.  This batch I made garlic & dill. Yum.  That's all there is to it!

Plain chevre can be substituted for cream cheese and seasoned chevre goes well with crackers.  Plain chevre freezes well, just add seasonings after you thaw it. Fresh chevre lasts for two weeks in the fridge.

You can reuse your cheesecloth.  Wash it & then boil it for 5 minutes. I use the muslin type cheesecloth.

Turkeys

Our turkeys came yesterday.  My husband called me at 7am to let me know that the post office in Hartford, VT had called to rudley let him know that "our chickens are in & that we MUST come get them." Sorry to put you our Mr. Post Man. Don't you value job security? He was rude when I picked them up too. That's another subject! I packed up a heat lamp & some turkey starter crumbles before I left the house. They hatched out on 6/21/11 and shipped via priority mail through the post office in this box.
15 Bronze Breasted Turkeys, the minimum order through Welp Hatchery, occupied one half of this box. My children were estatic. "Mommy, do we get to play with them today at work?" I set up the heat lamp and plugged it in and wouldn't you know it, the bulb blew! A 200 watt light bulb came to the rescue and warmed them up quickly. My two legged kids played with them all day, making sure they had clean water and food and were doing ok. I packed them up after a long work day and headed home. Once home I set up a temporary brooder for them for the next week.
Next week I'll transfer them to the garden shed until they are big enough to go in the turkey hoop house where they will be moved daily to fresh new grass. Last year I raised Bronze breasted, a couple of White Hollands, and a one Bourbon Red. Seeing as I don't want to let them breed naturally I opted to just go with the Bronze this year.  Last year the bronze was 31 lbs dressed. The Hollands were 7 & 9 lbs and the Bourbon Red tom was 17 lbs. The Hollands and the Bourbon Red. could fly and the Bronze could not so it will be easier to keep them in this year.  I will probably sell all but 4.  This is what I have done for the past three years and it has worked out well.

My two year old gently holding one of her new turkeys.

"I wan dat un."


Thursday, June 16, 2011

Summer Pasture

I feel so far behind.  The weather has not cooperated very well this year. Rain, rain & more rain.  We were all done with first cut haying last year at this time.  This year we are not even half done.  I haven't got my garden 100% planted yet either. I did give all the goats their summer haircuts and I did get summer fencing put up.  I moved my bucks out behind our house.  We let our back lawn grow up so they could have a place to graze. They like the fresh green grass & I like saving hay. Not to mention it cuts down on lugging hay. I don't feed my bucks grain in the summer, they don't need it.
Here they are happily grazing.

Monty munching away.


Here are Vigilante & Aonghas happy to have some green grass.

I used the electric netting fence from Premier1.  It is portable & easy to set up, take down or move to a new location. I like the shorter fence but this year it was on back order so I purchased the 42" which I do not like as well because it sags more. For what it is I will deal with it. I now have 5 sections of fence that are 164' long, enough to make three separate grazing pastures.

Wednesday, June 15, 2011

Yogurt

I love yogurt.  I like to have it for breakfast with some crunchy granola or cajeta drizzled on top. Yogurt is really easy to make.  Begin by mixing 2 Tbsp sugar, 1 Tbsp instant vanilla pudding & 1 qt milk in a saucepan. Warm the mixture to 185°F, do not let boil. Once the temp reaches 185°F remove from heat and place container in a sink filled with cold water. Let the temperature fall to 112°F and add 1/8 tsp yogurt starter culture or add a couple Tbsp of your favorite yogurt for starter, make sure it has live cultures listed on the label.  Let dry culture rehydrate for 2 minutes and gently stir in.  Place in yogurt maker or something to maintain temp at 112°F for 4 hours.  Put in fridge and the mixture will thicken. If you like tart tasting yogurt keep at 112°F for more than 4 hours.
 There are many ways to make yogurt.  Some have no sugar, some use powdered milk and some use vanilla extract for flavoring, others use gelatin or pectin to thicken it.  Homemade yogurt will not be as thick as store bought yogurt.  I have found that by cooking it to 185°F my yogurt is thick and that by using the instant vanilla pudding it tastes like vanilla & perhaps it helps with the thickness too.  Experiment until you get the consistency & flavor that you like.

Tuesday, June 14, 2011

Cajeta & Goat Cheese Brownies

What to do with all the chevre & cajeta in my fridge?  I scouted the Internet again for new ideas on using up my yummy goods. I came across the Fat Toad Farm website & their recipe for brownies. The recipe can be found here: http://www.fattoadfarm.com/2009/fat-toaders-brownie-recipe.

Not only would this use up some chevre and cajeta but it would use up some eggs too- perfect!
I mixed up and cooked for 60 minutes per directions.  Boy did they look yummy!

And the taste test confirms that yes indeed they are yummy!

Monday, June 13, 2011

Homemade Laundry Soap

I've been making laundry soap for two years now. I began making it because I was using cloth diapers on my youngest daughter.  I was using All Free & Clear liquid detergent prior to making my own. The problem I was having was that after I washed the cloth diapers they still smelled TERRIBLE! After doing some research and spending oodles of money on an all natural powdered detergent (which worked, the diapers no longer smelled) I decided to try making my own.  I have been making goat's milk soap for five years and so it only seemed logical to make laundry detergent with it. At first I was skeptical about using powdered detergent but I didn't want to go through all the effort of making liquid detergent, finding a large container and dealing with gel after all, the powdered detergent I had tried worked perfectly. So I scoured the Internet for recipes. The one I use has my homemade goat's milk soap, baking soda, borax, washing soda and oxyclean.  I no longer have to use fabric softener and my clothes are just as clean as they were when I was using store bought detergent.
I packaged some up this weekend to put down in the farm stand.  I did not include the oxyclean in this batch so it is all natural. Using one Tbsp per load each of these jars is enough to do 40 loads of laundry.

Sunday, June 12, 2011

Cajeta

Yesterday I decided to use up some of my surplus goat's milk.  I made Cajeta (pronounced ca-heh-tah).  Cajeta is a sweet Mexican carmael sauce made from goat's milk.  It can be used on anything you normaly use caramel sauce on, such as apples, cakes, ice cream, frappes, ice cream etc.

It is a simple recipe, but be warned, it took me three plus hours from start to finish.

I used the recipe from Goat's Produce Too! by Mary Jane Toth.
  • 3 qts goat's milk
  • 3 c sugar
  • 2 tbsp cornstarch
  • 1/4 tsp baking soda
Start by disolving the baking soda & cornstarch in 1 cup of the milk. Mix well to disolve any lumps. Combine with remaining milk & sugar. Bring to a boil , stirring constantly. The baking soda will cause foaming so make sure you use a pot large enough to compensate. Continue to stir until the mixture is thick & creamy, like caramel sauce. 


Once the mixture reached the caramel consistency I poured into sterile jars & canned in a water bath for 30 minutes. The 3 qts of milk produced 8 half pints of Cajeta.
Yum! I labeled & put some down in the farmstand.

Wednesday, May 25, 2011

Assisted Birth

I got a call this morning from a friend that was concerned about her goat.  She went to the barn this morning and found her goat had given birth to one kid.  The mother had the kid all dried off and there was no apparent afterbirth and she didn't appear to be having any further contractions.  My friend was concerned that she still had more kids in there because she still looked very pregnant.  I was headed to work and advised her not to wait more than an hour before she went in to see what was going on.  When I got to work she called me with no changes so I had her bring the goat to my place of work so I could help her.  When she got here I gloved up & went in. I almost couldn't get my hand in all the way and began to get butterflies in my stomach. Finally I was able to get in and I felt a head and two legs.  I pulled the legs but the head was turned back.  I didn't feel any movement from the kid and was concerned that the kid was dead.  I knew it had been at least two hours since labor had begun so I told my friend that I thought the kid was dead and pulled those two legs with all my might.  I was worried that the kid wouldn't come out because her head was turned back. I tried several times to get it turned in the right direction but without a kid puller I was helpless.  A customer & a delivery driver pulled in while I had my hand stuck up this goat's but. What a sight for them, a goat giving birth in the parking lot! I was sick to my stomach and told her I thought I was going cry. I envisioned this goat having a C-section but I wasn't ready to give up yet.  I pulled again and out popped the kid.  She was ALIVE!  Phew. I'm glad she remembered the towels so we had something to put her on.  We were talking and the momma goat was standing up cleaning off her newborn kid when we glanced at her but.  There was another kid's head sticking out.  I quickly pulled it out and we went to work suctioning out it's mouth and nose.  I tried shaking him upside down to drain out the fluid.  We worked on it for a few minutes but I think he was dead long before he was born.  He was a tiny little thing. Another bubble emerged and I popped it.  A few minutes passed and she wasn't having any noticeable contractions so I went in.  I found a but and followed it up a back.  While visualizing what position this kid was in with my hand for my eyes I found two hind legs tucked up under.  I broke the sac & pulled the two legs out bringing the kid out swiftly.  We quickly cleaned out his mouth & nose and he was fine.  I could see that the afterbirth was hanging now & that he was the final kid.  Quads. Two boys two girls, all with blue eyes.   I'm glad she brought her in and didn't wait.  The moral here is to trust your gut.  If something doesn't feel right it probably isn't.
Above is tired momma.  Two sleeping dried off kids to the top right and one just born to the left.
The last kid was pretty good size.  I think they got tangled up in there because one wasn't alive to move things along.

My 2 year old daughter, future goat doctor praising momma goat.
I'm happy that this story had a happy ending.

Sunday, May 22, 2011

Soap

Yesterday I taught a soap making class.  Six wonderful women attended and we made two batches of Goat's Milk Soap using milk from my goats. Everyone got to take home 5 bars of soap that I had made previously and a wooden soap mold that my husband made. It holds at least 2 lbs and makes 10 bars of soap.
One the soap molds above shown with 4 bars we made in class.
Soap cutter also made by my husband to cut even bars of soap.

Soap from class cut and ready to be brought upstairs to cure for at least a month.  After it has cured I will package & label it so it will be ready to sell.